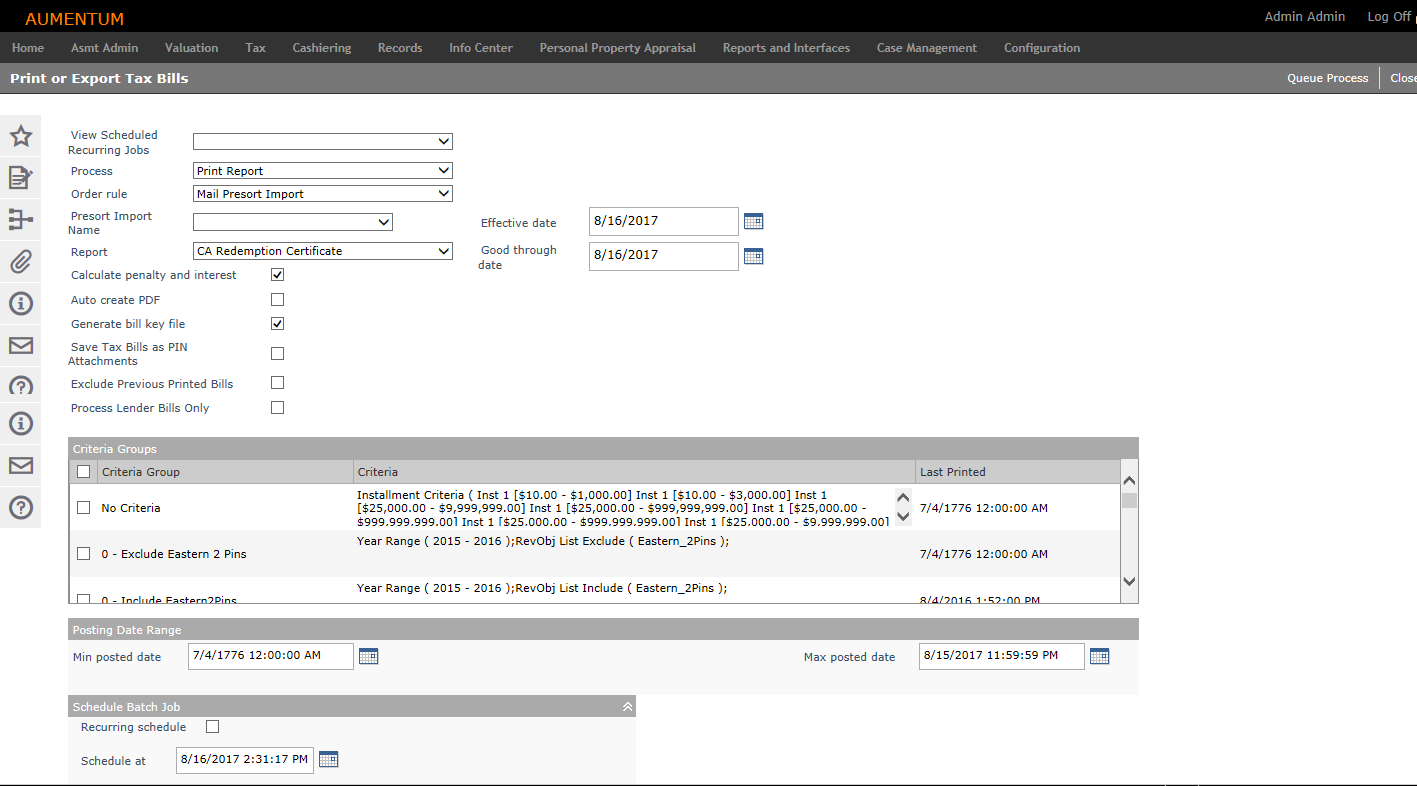
Print or Export Tax Bills
Navigate:  Tax > Billing > Bill Processing > Mass Bill Print and Export
Description
Select criteria to determine bills to print or export and how they will be produced. Aumentum Billing then generates XML files with tax bill data that you can export and convert to flat files or to PDF for printing. You can also print a variety of Report Types, including Tax Bills, Statements, and Truth in Taxation Notices.
You can produce an on-demand tax bill and specify the special assessment via Info Center. The data and amounts due for the special assessment for the particular parcel print on the Special Assessment Tax Bill. A switch in Info Center (InfoCenter.InfoCenterBR.ICUtil.cs) determines whether a SPA bill should be printed. If so, a MassRpt API function (PrintSingleSpaBill(BillType, ObjectTypeIds.TaxBill, TaxBillIds, tafId) is called.
NOTE: The custom county code in MassRpt handles the TAF Id. Contact your Aumentum Support representative to set this up.
This topic describes:
You must select the Process Model application setting to specify roll-based or event-base processing.
- Click Configuration > Application Settings.
- On the Maintain Application Settings screen, select Tax Year from the Setting type drop-down list, and select Tax Levy Management from the Filter by module drop-down list.
- Locate Process Model and click Edit.
- Make a selection from the drop-down list in the Setting Value column and click Apply.
- Click Save in the Command Item bar.
- Click Close to end the task.
Roll-Based Processing
-
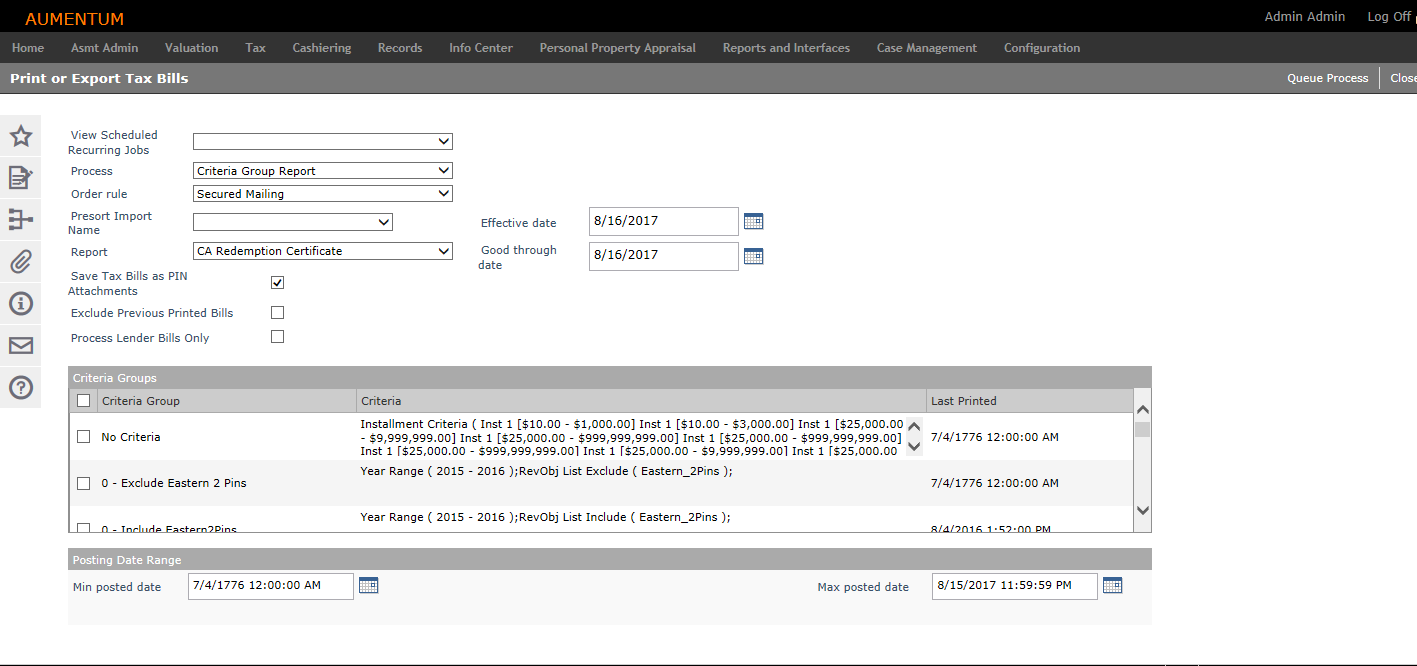
On the Print or Export Tax Bills screen, make a select from the Process drop-down list.
-
Make a selection from the Order rule drop-down list to group and sort the tax bills. Order rules are set up via Tax > Billing > Setup > Sorting and Grouping Rules.
- If you imported a mail presort file sorted by third-party software, you can select the Mail Presort Import rule.
- Make a selection from the Presort Import Name drop-down list.
- Make a selection from the Report drop-down list. The default bill type for the Billing module is displayed. You can choose from the additional report types you created via Tax > Billing > Setup > Report Setup.
- Make a selection from the Attachments drop-down list.
-
Enter or select the effective date, which is printed on the bills and indicates when they were issued.
-
Enter or select the Good Through Date. This is the date the balance pay off amount will be good through. After this date, penalty and/or interest may apply.
-
Choose whether to calculate penalty and interest automatically before generating the bills.
NOTE: This checkbox is displayed based on the report you selected to print. Generally, if prior year taxes are printed on the bill, the checkbox is hidden because the prior year taxes always need penalty and interest calculated to retrieve the current charge amounts as of the Good Through Date. If the bill does not include prior year taxes, you can skip calculating penalty and interest if it is unnecessary. By default, this checkbox is selected because in most cases interest and penalty need to be calculated. You can clear this checkbox to increase performance during bill creation. Examples of such circumstances are:
-
The bills do not contain prior year delinquent information and are being sent out for the first time to the taxpayers.
-
The Apply Penalty/Interest Batch Process in Accounts Receivable is up to date for all bills, and has been processed for a good through date which is not in the future.
-
Select the Auto-create PDF files checkbox to generate XML files. You can also create output files from the XML on the View Mass Process Ranges screen.
NOTE: Auto-creating the PDF files increases the processing time. Turning this option off increases processing time and enables you to check the bill data in the XML files before generating the PDFs.
-
Select the Generate bill key checkbox to create an output file listing the PIN, bill number, tax year, and file name for the bills.
NOTE: When you select this checkbox, you navigate to the Monitor Mass Processes screen when you click Queue Process. There is an additional Electronic delivery status label below the status, which includes the following messages:
-
Waiting for mass process to complete – until the process completes
-
No eGov registrations were found – if the process completes and there were no legal parties configured for e-bills
-
Ready to queue to eGov – if it completes and there were legal parties configured and "Queue electronic bills to eGov" was not checked
-
Sent __ files to eGov – if it completes and there were legal parties configured and "Queue electronic bills to eGov" was checked
-
Select the Exclude Previous Printed Bills checkbox, if desired.
-
Select the Use tax bill modification date range checkbox to print only supplemental and correction tax bills based on the modification date. Three additional fields display.
-
Enter or select the Min bill change and Max bill change date.
-
Select the user who initiated the correction to the tax bill from the Correction initiated by user drop-down list.
-
Select the Generate electronic bills checkbox if the account is a registered eGov account to generate the bill to the specified email address associated with the account.
-
Select the Auto deliver electronic bills checkbox to automatically deliver the bills to the email address associated with the account.
- Make a selection from the E-Bill Selection Option drop-down list.
-
Select the tax rolls to print bills for. Tax rolls are created in Levy Management > Tax Roll Processing. Only tax rolls posted in the selected tax year are displayed.
NOTE: The PIN count and the date the bills were last printed are displayed for each roll.
-
In the Criteria Groups panel, you can select the checkbox for one or more items. The date the bills were last printed is displayed for each group.
NOTE: If you select more than one criteria group, you can create a new group that includes all the criteria you need.
-
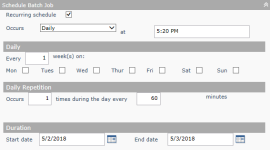
In the Schedule Batch Job panel, enter or select the date and time you want to schedule the job.
OR
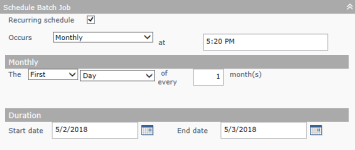
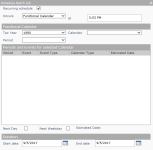
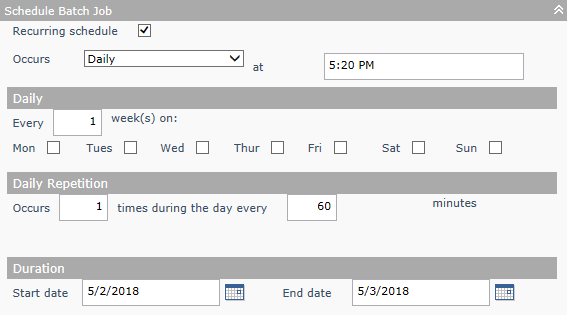
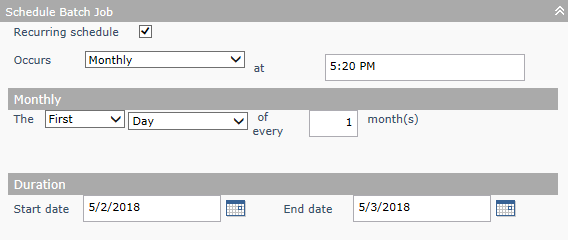
Select the Recurring schedule checkbox and make a selection from the Occurs drop-down list to define a recurring schedule.
Daily
Monthly
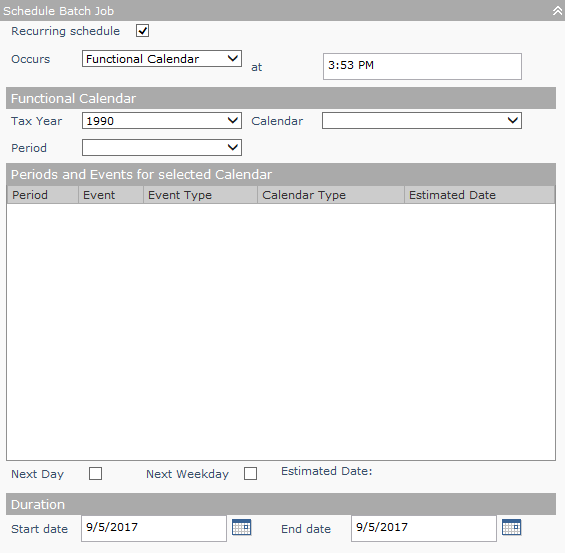
Functional Calendar
TIP: If you are printing bills for a large tax roll and want to run the process when it will not slow down the system for others, schedule it to start after normal working hours.
-
Click Queue Process to submit the process to the mass processing queue.
-
On the Monitor Mass Processes screen, bills are processed in ranges and you can track their status on the View Mass Process Ranges screen. If one range fails, the others are unaffected. You can process ranges simultaneously to speed the process.
- A Selection Criteria Report that shows your selections is output as part of the batch process.
-
Click Close to end the task.
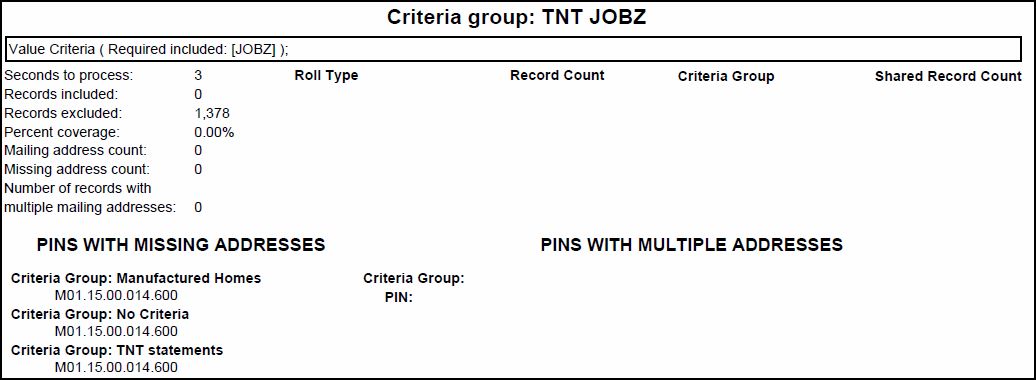
NOTE: The Criteria Group Report gives a summary of the bills that will be printed for the selected tax roll(s) by Criteria Group.
Contact the Aumentum Support team if you aren't sure whether to calculate penalty and interest.
The index file is named ElectronicDeliveryIndex.xml.
Additionally, all electronic bills are included in the standard BillKey.txt file, at the end. Also, Legal Party Name is included in this file.
Event-Based Processing
A date range is used as the main criteria for filtering bills to support event-based processing. You cannot select a tax roll. All bills for the tax year print if they meet the criteria.
-
On the Print or Export Tax Bills screen, make a select from the Process drop-down list.
-
Make a selection from the Order rule drop-down list to group and sort the tax bills. Order rules are set up via Tax > Billing > Setup > Sorting and Grouping Rules.
- If you imported a mail presort file sorted by third-party software, you can select the Mail Presort Import rule.
- Make a selection from the Presort Import Name drop-down list.
- Make a selection from the Report drop-down list. The default bill type for the Billing module is displayed. You can choose from the additional report types you created via Tax > Billing > Setup > Report Setup.
- Make a selection from the Attachments drop-down list.
-
Enter or select the effective date, which is printed on the bills and indicates when they were issued.
-
Enter or select the Good Through Date. This is the date the balance pay off amount will be good through. After this date, penalty and/or interest may apply.
-
Choose whether to calculate penalty and interest automatically before generating the bills.
NOTE: This checkbox is displayed based on the report you selected to print. Generally, if prior year taxes are printed on the bill, the checkbox is hidden because the prior year taxes always need penalty and interest calculated to retrieve the current charge amounts as of the Good Through Date. If the bill does not include prior year taxes, you can skip calculating penalty and interest if it is unnecessary. By default, this checkbox is selected because in most cases interest and penalty need to be calculated. You can clear this checkbox to increase performance during bill creation. Examples of such circumstances are:
-
The bills do not contain prior year delinquent information and are being sent out for the first time to the taxpayers.
-
The Apply Penalty/Interest Batch Process in Accounts Receivable is up to date for all bills, and has been processed for a good through date which is not in the future.
-
Select the Auto-create PDF files checkbox to generate XML files. You can also create output files from the XML on the View Mass Process Ranges screen.
NOTE: Auto-creating the PDF files increases the processing time. Turning this option off increases processing time and enables you to check the bill data in the XML files before generating the PDFs.
-
Select the Generate bill key checkbox to create an output file listing the PIN, bill number, tax year, and file name for the bills.
NOTE: When you select this checkbox, you navigate to the Monitor Mass Processes screen when you click Queue Process. There is an additional Electronic delivery status label below the status, which includes the following messages:
-
Waiting for mass process to complete – until the process completes
-
No eGov registrations were found – if the process completes and there were no legal parties configured for e-bills
-
Ready to queue to eGov – if it completes and there were legal parties configured and "Queue electronic bills to eGov" was not checked
-
Sent __ files to eGov – if it completes and there were legal parties configured and "Queue electronic bills to eGov" was checked
-
Select the Exclude Previous Printed Bills checkbox, if desired.
-
Select the Use tax bill modification date range checkbox to print only supplemental and correction tax bills based on the modification date. Three additional fields display.
-
Enter or select the Min bill change and Max bill change date.
-
Select the user who initiated the correction to the tax bill from the Correction initiated by user drop-down list.
-
Select the Generate electronic bills checkbox if the account is a registered eGov account to generate the bill to the specified email address associated with the account.
-
Select the Auto deliver electronic bills checkbox to automatically deliver the bills to the email address associated with the account.
- Make a selection from the E-Bill Selection Option drop-down list.
-
Select the Process Lender Bills Only checkbox to open a Lenders panel from which you can select one or multiple lender bills to process.
-
In the Criteria Groups panel, you can select the checkbox for one or more items. The date the bills were last printed is displayed for each group.
-
In the Schedule Batch Job panel, enter or select the date and time you want to schedule the job.
OR
Select the Recurring schedule checkbox and make a selection from the Occurs drop-down list to define a recurring schedule.
Daily
Monthly
Functional Calendar
TIP: If you are printing bills for a large tax roll and want to run the process when it will not slow down the system for others, schedule it to start after normal working hours.
- The Posting Date Range panel is populated with the last printed date for the selected criteria group.
-
Click Queue Process to submit the process to the mass processing queue.
-
On the Monitor Mass Processes screen, bills are processed in ranges and you can track their status on the View Mass Process Ranges screen. If one range fails, the others are unaffected. You can process ranges simultaneously to speed the process.
- A Selection Criteria Report that shows your selections is output as part of the batch process.
-
Click Close to end the task.
NOTE: The Criteria Group Report gives a summary of the bills that will be printed for the selected tax roll(s) by Criteria Group.
Contact your Aumentum Support representative if you aren't sure whether to calculate penalty and interest.
The index file is named ElectronicDeliveryIndex.xml.
Additionally, all electronic bills are included in the standard BillKey.txt file, at the end. Also, Legal Party Name is included in this file.

NOTE: If you select more than one criteria group, you can create a new group that includes all the criteria you need.
Print and Export Output
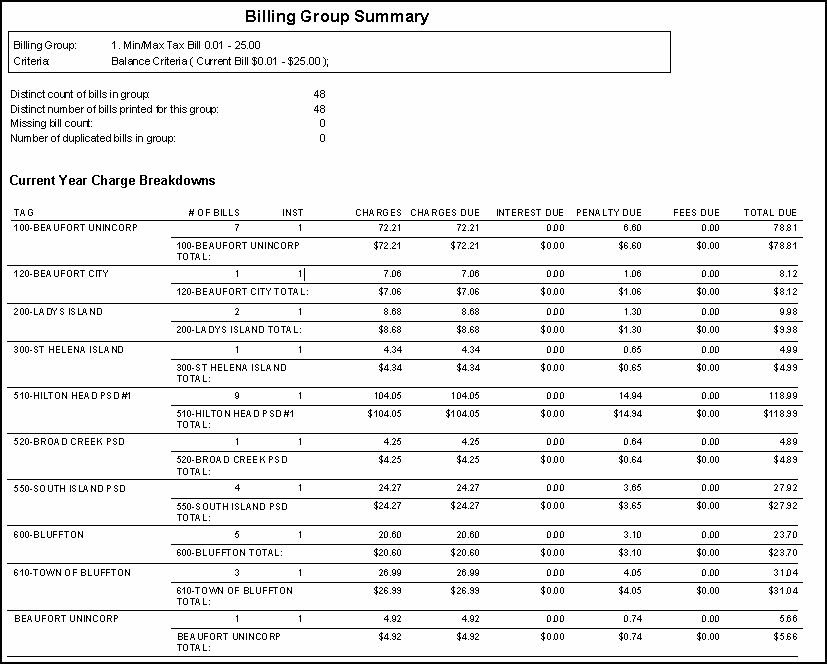
A separate XML file (and optional PDF file) is created for each mass process range. The mass billing process also includes an error file as well as a Billing Group Summary that lists by billing group the number of bills and also charge details for each tax roll, tax authority group, and lender. The report also includes totals for the distinct number of bills in the billing group and any duplicated bills in the group, so that you can avoid mailing duplicate bills.
Report Samples
Billing Group Summary
Criteria Group Report
Common Actions
View Mass Processes – Check the status of existing mass billing processes.
Charge Mapping – Navigates to the Maintain Charge Maps screen for maintaining charge mapping.
Criteria Groups – Accesses the Add or Edit Criteria Groups screen for the purpose of creating new criteria groups.
Report Setup – Navigates to the Search for Reports screen for selecting the report for report setup.
Order Rules – Navigates to Add or Edit Sorting and Grouping Rules screen for the purpose of defining order rules.
Prerequisites
Billing
-
Report Messages – The messages must be set up.
-
Report Setup – The bill types must be created.
-
Criteria Groups – At least one billing group must be set up.
-
Value Maps – The value maps must be set up.
-
Charge Maps – If your jurisdiction uses charge mappings, they must be set up before you can process bills. When using charge mappings, all TAFs must be mapped before you can print/export tax bills, tax statements, or Truth in Taxation notices.
Configuration Menu
-
Functional Calendar – The functional calendar must be set up for the tax year.
Levy Management
-
Process Tax Roll – Taxes must have been calculated.
-
Maintain Tax Rolls – The tax roll must be posted.
Tips
It is recommended that you use a text editor application to open the .xml or .xsd files which are output if you are exporting tax bills, because the output can be very large and are not easily viewed with Microsoft® Internet Explorer.
Check the end of the PDF files created if bills appear to be missing from the print run. If sequence numbers do not exist for bills being printed, the taxbillid is used instead, and the bills are added to the end of the run in the last PDF file.
Power User: If the printing process takes longer than expected, check to see if some previous process is not complete (see Monitor Batch Processes). Data might be left in certain temp tables, causing the print process to run slowly. To fix this, clear out the following temp tables and restart all processes: billrevobj_t, billrange_t, printparty_t, billlevyhdr_t, billlevyval_t, critresults_t, mailpresort_t, tmp_tbdriver, and tmp_lpdriver.
The system looks at the Effective date entered here and the Correspondence type entered for the mail-to legal party in Bill Type setup to find the address to use for a specific party to make sure bills are sent to the correct address for snowbirds (parties whose residence changes seasonally). See Maintain Report Type Legal Party Print/Export Rules.
Bills can also be printed on demand from the Information Center or from the Collect Payments screen in Cashiering. To print multiple selected bills use Selected Bill Processing.
To send bills for mortgaged properties to a lender, use the Print or Export Tax Bills and Lender Reports tasks.